
Intro to Damn Vulnerable Router Firmware(DVRF) v3.0
With my career moving forward I figured I should handle more advanced topics in the infosec field. Gaining a few years of experience has allowed me to obtain some insight into other fields that have sparked my interest. With that being said, I've taken an interest in reversing and the methodology of exploitation of embedded systems. I came across the Damn Vulnerable Router Firmware (DVRF) from the hacker handle @B1ack0wl in the following GrrCon video. This project was created to help aid entry into this field and mimics the Linksys E1550 Device. With my credit given, let us move on to the post!
Setup
The project is accessible through GitHub and comes with simple instructions for setup. The project points out that if you have the specific Linksys device then you can flash it onto the device, if not, you can use QEUM to simulate the device. Not surprisingly, I don't have this specific device laying around so I'll be simulating. With binwalk, QEUM, and buildroot all installed I was ready to start analyzing the firmware!
Binwalk
Binwalk is a tool that can be used to break down the firmware file into its subsequent files and directories. I like to think of it as the scalpel tool, but better. The tool gives an overall context of the firmware and helps us identify the type of file system and files we are dealing with. I used some the following extraction options to export the file system.
Extraction Options:
    -e, --extract                Automatically extract known file types
    -D, --dd=<type:ext:cmd     Extract <type> signatures, give the files an extension of <ext>, and execute <cmd>
    -M, --matryoshka             Recursively scan extracted files
    -d, --depth=<int>            Limit matryoshka recursion depth (default: 8 levels deep)
    -C, --directory=<str>        Extract files/folders to a custom directory (default: current working directory)
    -j, --size=<int>             Limit the size of each extracted file
    -n, --count=<int>            Limit the number of extracted files
    -r, --rm                     Delete carved files after extraction
    -z, --carve                  Carve data from files, but don't execute extraction utilities
    -V, --subdirs                Extract into sub-directories named by the offset
The most helpful options we have here is the -e and -M. But what does all the output mean? Lets break it down. The first two columns are indicators of where the header was found, followed by the description of the header. These headers are identified by magic bytes, if you haven't heard of magic bytes I recommend reading this. The most important information we received from this is the identifiable file system type, that being Squashfs.
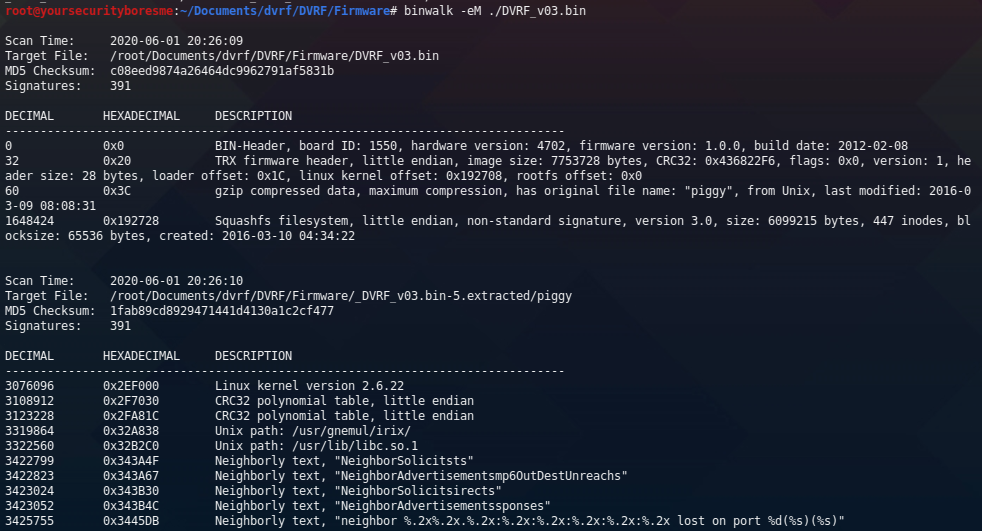
Executing the binwalk command also created the file system in the current working directory. Here is our exported listing of the new file system of our firmware.

With all this, we are all set for the virtualization of our firmware! All that is left is to run the final command to begin emulating.
Emulating Firmware/Buffer Overflow 1
Running our first test we can see that the first BOF challenge is located under pwnable/Intro/stack_bof_01. To start emulation we can use the following command;

Awesome, seeing that this is the first round of challenges I'm going to assume that the buffer overflow is going to be relatively easy. I started by trying to put as many "A's" as possible to crash the executable. You can use whatever programming language you're comfortable with the repeat the A's until you crash the program - for me it was Python. I started by guessing a bunch of random values, 100, 200, 250, etc. At 250 characters I finally received a segmentation fault. With the crash, I can use this Python script to create a 250 character string to seek out the offset.

On a second terminal, we will run our gdb server:
gdb-multiarch
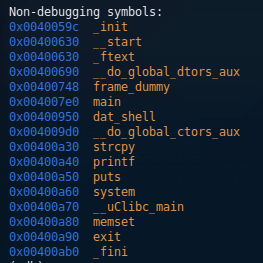
gef-remote -q 127.0.0.1:1337The segfault indicated the offset was 0x41386741, when decoded from hex to ascii and converted little-endian, we get the unique string Ag8A. This unique string identifies the buffer size we get to work with is 204 characters before hitting the instruction register. Next, I identified the function that needs to be called. I used gdb info functions to see what functions are present. We can see dat_shell is our function we want to jump to.
Now I have the address I want to jump to 0x400950. I preeminently worried about the null byte at the beginning, thinking it was going to cause me trouble when reading the payload. After a little research and testing, I realized that it does not matter because the null byte is at the beginning of the address, thus if I leave that part blank, it will still be understood correctly. At this time, I crafted my payload and sent it on its way;
chroot . ./qemu-mipsel-static -g 1337 ./pwnable/Intro/stack_bof_01 "$(python -c "print 'A'*204+'\x50\x09\x40'")"When I sent the payload, I got hit with a segmentation fault at 0x400970. I was surprised by this - until it hit me that I'm not reversing x86 architecture, but MIPS. Thus, simply jumping to a function is not going to work in this case. I began to disassemble the dat_shell function;

First looking at what instruction is at 0x400970 is a lw v0, -32740(gp). Looking at MIPS instruction set, it loads a word into a register from a specific address. The address is stored in the $gp, and as we can see above, the $gp is being manipulated a lot in the first three instructions of the function. Digging more into this I found that I can bypass this issue in two ways, make my jump address pass all the $gp manipulation (0x40095c), like so;

OR, I can create my own /bin/sh execution in the 204 character buffer and try to jump to that. Looking forward into this firmware, I can see this exact situation coming on the next BOF challenge. So, I'm going to save it for that.
At this point, I'm going to end the post and research more about MIPS and how I'm going to manipulate the stack more to get the function working properly. I assume I'm going to use the buffer I have available to do this but for now, my MIPS knowledge has reached the end for this post. This was overall a fun experience, I got to look at different architecture and have a good foundation of tools for future projects! I'm genuinely excited to keep learning.